One reason for WordPress popularity is the low system requirements needed to run this CMS on a web server:
PHP version 5.2.4 or greater.
MySQL version 5.0.15 or greater or any version of MariaDB.
You would probably have to search for a hosting provider which lacks WordPress support. Many hosts use various auto-installers to make the WordPress installation process as simple as possible. By using auto-installers, users no longer have to deal with database creation or file uploading.
In this part of our WordPress tutorial, you will learn two different ways to install WordPress.
Before proceeding with WordPress installation, you need to decide on how you want to access your website. Do you want WordPress on your domain name root (example.com), subfolder (example.com/blog) or subdomain name (blog.example.com)? Only if you want to setup WordPress on a subdomain name, you will have to take an additional step and create a subdomain name.
Option 1.1 – Installing WordPress by Using Auto Installer
Let’s start with the simplest and fastest way to install WordPress – auto installer. The steps below show how to install WordPress on control panel:
- Access control panel.
- Locate Auto Installer and open it.
- Enter WordPress in the search field and click on its icon.
- Now fill in website details:
- URL – The URL where WordPress should be installed. If you want to install it on root domain name (example.com) then leave it empty.
- Language – Choose WordPress language.
- Administrator Username – Your WordPress admin username. You will use it to access WordPress admin area.
- Administrator Password – Your WordPress admin password. You will use it to access WordPress admin area.
- Administrator Email – Enter your email address.
- Website Title – The title of your WordPress website.
- Website Tagline – A short sentence explaining what your website is about.
- Press Install button.
Option 1.2 – Installing WordPress Manually
If you want to understand the basics and learn how WordPress works, you can install it manually. WordPress is famous for its 5-minute installer. The process is straightforward and similar to any other software installation. So if you have ever installed any computer program – it won’t be hard for you to complete the WordPress installation.
What you need before proceeding:
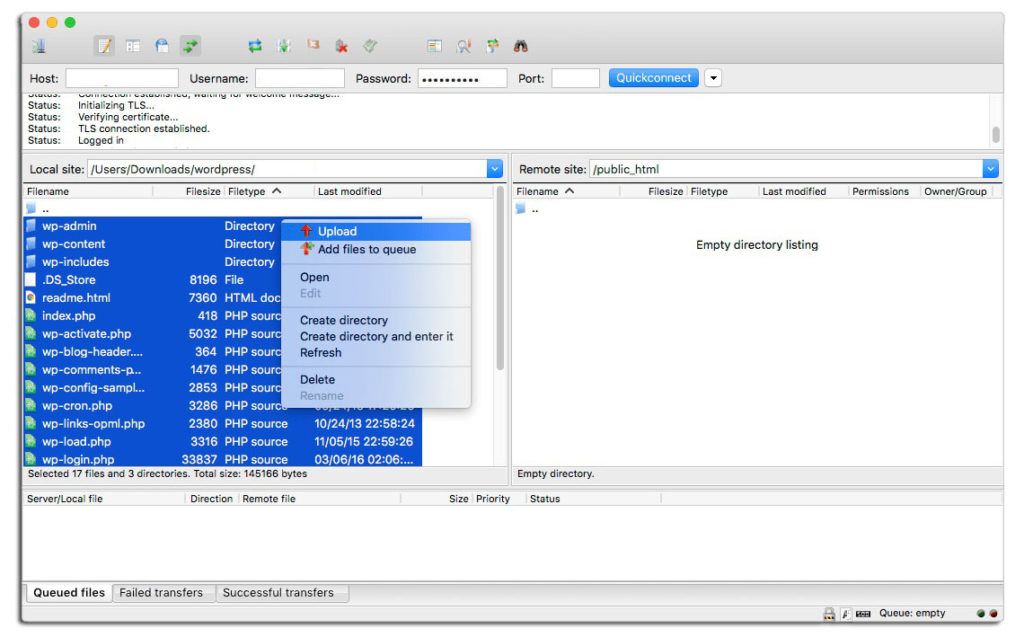
- FTP client or File Manager
- Latest Version of WordPress
First of all, download the latest WordPress from the official WordPress.org website.

Once the download is complete, you can start uploading WordPress files to your hosting account. You can use either a File Manager provided by your hosting, or an FTP client. There is no difference which tool you will use to upload WordPress files. The only thing that you should take into account is the destination directory. For example, if you want to have WordPress on a root domain name, files should be uploaded to the public_html folder; if you want to serve WordPress from a subdomain name or a subfolder, upload the files to the appropriate directory.
WordPress stores information in the database. Thus, it’s mandatory to create one. A new database can be created in the MySQL Databases section in domain cpanel. Be sure to write down the database details as you will need them later.
Now visit your domain name in order to start the installation process. You’ll be asked to fill in the MySQL database information, administrator details and the site information.
Author: Teji
i am admin